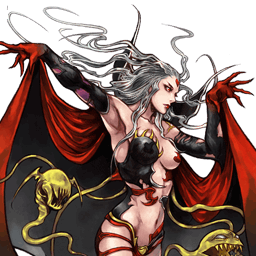
A defender with tentacle stances and a command block, between close and midrange
Fastest BRV 13F (Tentacle starters)Fastest HP 39F (Anti-Air P. Beam)Dash 85 (Slow)ATK 109DEF 1111-hit HP YesMultipleHP links YesCombos only
Standing in the meta
Tier C28th of 30 — 2017 tournament tier list from dissidia.wiki (half matchup values, half expert player votes).
Ranked 28th, in tier C, on the 2017 tier list; the overview describes her historically as one of the weakest characters in competitive play.
Overview
Cloud of Darkness is a defensive fighter between close range and midrange. Every bravery attack is a mobile three-part stance, with three different follow-ups depending on the timing of the input — a reactive style: occupy space on the ground with mid priority attacks, or deliver a flurry of blows. Her many HP attacks cover combos and neutral: Anti-Air Particle Beam for solo HP combos, Aura Ball to bide her time, and the singular Wrath Particle Beam command block to stop aggressive opponents.
Despite a low base ATK, she makes use of damage builds as well as Side by Side builds, and she even has a unique, slightly gimmicky synergy with a Mindbreak build for outsized amounts of bravery.
Historically, she is among the weakest characters in competitive play, first of all because of her bravery attacks: the three-part stance has to be finished before she can dodge — every bravery attack is an exceptionally long commitment. That makes applying pressure and filling the assist gauge difficult: the slow gain on whiff is a real momentum problem. Most of the third-part follow-ups have no properties that justify their startup, and her aerial bravery attacks offer little protection against rushdown while remaining blockable. A big punish reward often requires an assist, a wall and/or the ground, none of which she imposes easily, and her slow mobility makes her lose the race for EX Cores and gauge against defensive opponents.
She can thrive just outside poke range in a defender's position, but she lacks notable strengths to make up for her flaws: minimising risk and staying in the race becomes very demanding at a high level.
Strengths
Command block: Wrath Particle Beam is one of the safest command blocks in the game, valuable for self-defence after an air dodge and for stopping aggressive opponents.
Glide: the ability to move during bravery attacks, which makes whiffs a little safer and allows her to adapt to the situation.
Weaknesses
Extremely committal bravery attacks: long animations, therefore telegraphed, vulnerable to (advancing) blocks, risky through their long recovery and with inconsistent combo opportunities despite the long startup.
Assist gain on whiff: she cannot fill the gauge quickly by throwing out attacks, which deprives her of a key resource for damage and comebacks.
A failing anti-air: it is hard to stop the opponent hovering above her (slow startup, high commitment, blind spots, unreliable hitboxes); Tentacle of Pain 1, her fastest option, converts poorly with an assist.
Anti-turtling: opponents can run away and outpace her on EX Cores and assist gauge; slow mobility, telegraphed HP attacks with long recoveries and mediocre long-range provocation tools.
A distance dilemma: she is safest just outside close range, but her fastest bravery punishes require her to be in contact; the initial hitboxes of the stances are small, her mixups limited and her whiffs long to sit through.
A high Capacity Point cost: a full attack loadout is expensive and leaves little room for extra abilities.
Stats & speeds
Name
Cloud of Darkness (暗闇の雲)
Original game
Final Fantasy III
Base ATK (LV100)
109 (Low)
Base DEF (LV100)
111 (Average)
Run Speed
9 (Slow)
Dash Speed
85 (Slow)
Fall Speed
109 (Very Slow)
Fall Speed Ratio After Dodge
45 (Slowest)
Fastest BRV
13F (Tentacle starters)
Fastest HP
39F (Anti-Air P. Beam)
1-Hit HP
Yes (Multiple)
HP Links
Yes (Combos only)
Command Block
Yes (Wrath P. Beam)
Weapon
Poles, Rods, Staves, Thrown Weapons
Armor
Bangles, Clothing, Hats, Hairpins, Robes
Exclusive weapons
Calcite Staff, Bizarre Staff, Everdark
Alignment
Chaos
Voice Actor (JP)
Masako Ikeda
Voice Actor (ENG)
Laura Bailey
Mobility profile (normal mode) — position within the cast
Gold dot: this character · small dots: the rest of the cast · violet line: average. Wiki values, lower = faster; the rank on the right reads directly (1st = fastest).
Moves
Startup of Cloud of Darkness's moves
Shorter bar = faster move. Startup in frames (60 fps, dissidia.wiki data), with priority after the value. Moves marked ★ are the fastest in the kit — usually your best punish and pressure tools.
Bravery attacks
List
All the bravery starters share the same basic properties.
Tentacle Pain 1st13F / 33F / 53FMelee Low
Base damage
21 (7, 7, 7)
Startup
13F / 33F / 53F
Type
Physical
Priority
Melee Low
EX Force
each 9
Effects
--
Ground
Tentacle of Pain+4FMelee Low
A ground stance with three follow-ups. Pain 1 (3 bites): a fast string with heavy hit stun and 90 EX, but assist combos are impractical without a wall or an early call. Pain 2 (a shove): a midrange option that pushes back assaults, with high base damage and a Wall Rush into assist combos. Pain 3 (bolts): a combo starter and a midrange punish — the swipes combo into the bolts, which lead into her aerial bravery attacks or into Anti-Air Particle Beam, with enough hit stun to combo into an assist.
Followup 1+4FMelee Low
Base damage
30 (8, 8, 14)
Startup
+4F
Type
Physical
Priority
Melee Low
EX Force
90
Effects
Chase
Cancels
Dodge
CP (mastered)
?? (30)
Followup 2+4FMelee Low
Base damage
48 (12 x 4)
Startup
+4F
Type
Physical
Priority
Melee Low
EX Force
0
Effects
Wall Rush
Cancels
Dodge
CP (mastered)
?? (30)
Followup 3+34FRanged Low
Base damage
12 (4 x 3)
Startup
+34F
Type
Magical
Priority
Ranged Low
EX Force
0
Effects
--
Cancels
Dodge
CP (mastered)
?? (30)
Tentacle of Spite+4FMelee Low
A ground stance whose mid priority follow-ups are useful in neutral, to be mixed with Tentacle of Pain. Spite 1 (a sweep): a fast way to clear space whose Wall Rush leads into assist combos and forces a ground Wall Rush reaction even against Auto Recovery. Spite 2 (a spin): mid priority self-defence and an assist combo starter, with suction, but a vulnerable recovery after the launch. Spite 3 (an orb): one of her best ground bravery attacks — a Ranged Mid homing orb that staggers blocks, pulls the opponent upwards and holds them long enough for assist combos; it has a blind spot above her and its hits can drop off on extended limbs.
Followup 1+4FMelee Low
Base damage
28
Startup
+4F
Type
Physical
Priority
Melee Low
EX Force
0
Effects
Wall Rush
Cancels
Dodge
CP (mastered)
60 (30)
Followup 2+8FMelee Mid
Base damage
40 (3 x 8, 16)
Startup
+8F
Type
Physical
Priority
Melee Mid
EX Force
84
Effects
Absorb
Cancels
Dodge
CP (mastered)
60 (30)
Followup 3+12FRanged Mid
Base damage
18 (3 x 6)
Startup
+12F
Type
Magical
Priority
Ranged Mid
EX Force
0
Effects
--
Cancels
Dodge
CP (mastered)
60 (30)
Aerial
Tentacle of Suffering+2FMelee Low
An aerial stance. Suffering 1 (a thrust): fast, with strong vertical tracking, it creates distance and punishes near walls; it combos into the Aerith assist anywhere through a Chase (Kuja/Jecht require a ceiling or a corner) and serves as a combo filler during Exdeath's aerial BRV assist. Suffering 2 (360°): range all around her but telegraphed and vulnerable to blocks; a close-range punish that holds long enough for midscreen assist combos. Suffering 3 (2 balls): a fairly safe option against blocks at mid distance; both projectiles connecting combos into an assist, and against The Emperor or Ultimecia they can be fired at walls to get them reflected and trigger Wrath Particle Beam.
Followup 1+2FMelee Low
Base damage
30
Startup
+2F
Type
Physical
Priority
Melee Low
EX Force
60
Effects
Chase
Cancels
Dodge
CP (mastered)
60 (30)
Followup 2+4FMelee Low
Base damage
40 (3 x 10, 10)
Startup
+4F
Type
Physical
Priority
Melee Low
EX Force
90
Effects
--
Cancels
Dodge
CP (mastered)
60 (30)
Followup 3+12FRanged Low
Base damage
each (8)
Startup
+12F
Type
Magical
Priority
Ranged Low
EX Force
0
Effects
--
Cancels
Dodge
CP (mastered)
60 (30)
Tentacle of Scorn+10FMelee Low
An aerial stance. Scorn 1 (2 hits): a fast jab to push away and whiff punish, with a Wall Rush that is useful near walls but short hit stun and knockback. Scorn 2 (vertical): long reach upwards or downwards depending on the opponent's position, with a Wall Rush both ways; all the easier to block the greater the distance, with a deadzone in front of her. Scorn 3 (projectiles): occasional downward pressure — if several projectiles connect, a Free Air Dash allows a combo behind them; it loses to dashes, so use it sparingly.
Followup 1+10FMelee Low
Base damage
30 (10, 20)
Startup
+10F
Type
Physical
Priority
Melee Low
EX Force
30
Effects
--
CP (mastered)
60 (30)
Followup 2+10FMelee Low
Base damage
28
Startup
+10F
Type
Physical
Priority
Melee Low
EX Force
0
Effects
Wall Rush
CP (mastered)
60 (30)
Followup 3+10FRanged Low
Base damage
each (3)
Startup
+10F
Type
Magical
Priority
Ranged Low
EX Force
0
Effects
--
CP (mastered)
60 (30)
HP attacks
Ground
[Anti-air] Particle Beam39FRanged High
[Close, 39F] Columns of darkness around her, used in solo combos after Pain 3, after a block stagger and to threaten airborne opponents. It leads into consistent assist combos anywhere, hence its value for finishing solo combos with Side by Side; its recovery is long enough to be punished (even by Kuja's BRV assist), and the opponent can fall out of the top of the beam.
Base damage
9 (1 x 9)
Startup
39F
Type
Magical
Priority
Ranged High
EX Force
87
CP (mastered)
30 (15)
[Wide-Angle] Particle Beam61FRanged High
[Long, 61F] A single-hit HP attack with a very wide hitbox: a forgiving assist combo ending, able to catch ground dodges played on autopilot. A unique synergy with Mindbreak builds (it destroys the scenery of World of Darkness and Pandaemonium - Top Floor to accumulate bravery). Long recovery after the shot: vulnerable to dodge > counter-attacks and to assist punishes; the hitbox is not as tall as the visual.
Startup
61F
Priority
Ranged High
EX Force
0
Effects
Wall Rush
CP (mastered)
30 (15)
[Long-Range] Particle Beam83FRanged High
[Long, 83F] Secondary zoning in neutral that leads into consistent assist combos on hit. Once fired, it stays active for a long time with tall hitboxes and average tracking: the opponent has to dodge through every beam. Punishable recovery, but just short enough to avoid slow ground BRV assists (Kuja, Tidus). It is also one of the best attacks to pair with the landing cancel bug, which makes it safer and turns it into a solo combo starter.
Startup
83F
Priority
Ranged High
EX Force
each 30
CP (mastered)
30 (15)
[Feint] Particle Beam61FRanged High
[Dodge, 61F] A dodge at the start then a cannon shot: it serves to avoid the opponent's attacks and it is her best HP combo filler with Jecht's aerial BRV or Kuja's ground BRV. A single-hit HP attack whose explosion stays active for a long time, but the invincibility is deceptively short and ends before she reappears; the direction of the movement can be controlled freely.
Startup
61F
Priority
Ranged High
EX Force
0
Effects
Wall Rush, Dodge
CP (mastered)
30 (15)
[Wrath] Particle Beam (ground)1F~13F (Block) ~56F (missed block recovery) 45F (counter attack)Block High / Ranged High
Her signature command block (an instant block 1F~13F, the counter at 45F): self-defence after a dodge and an anti-aggression tool. It staggers dashes and both low AND mid melee bravery attacks; on a successful counter, a beam dealing HP damage appears on the opponent with enough hit stun to start an assist combo, plus brief invincibility on activation. Against projectiles there is no stagger: the opponent can dodge the beam on reaction and she stays briefly vulnerable to assists; the short block duration demands real timing.
[Close, 63F/73F] Passive self-defence: detonating spheres (charge to create several, steerable with the stick) that let her fill the assist gauge more calmly. Wide explosions that stay active for a long time and stop assist punishes, with a relatively short dodge cancel; the ball explodes even if it gets hit. Beware of projectiles (Sephiroth's Shadow Flare, Gilgamesh's Electrocute) and of disjointed attacks such as Garland's Chain Cast; the long active frames also allow a little wake-up pressure in tight spaces.
Startup
63F / 73F
Priority
Ranged High
EX Force
each 60
CP (mastered)
30 (15)
[0-form] Particle Beam63FMelee High
[Mid, 63F] Her basic aerial HP attack: it ends assist combos and punishes block staggers, with horizontal/diagonal tracking, long active frames and very strong knockback suited to a Wall Rush. High risk all the same: slow startup, range too short against air dodges boosted by Adamant Chains, long recovery, and it is her only Melee High attack — reflecting a Ranged High projectile with it leaves her wide open.
Base damage
2 x 8 (16)
Startup
63F
Type
Magical
Priority
Melee High
EX Force
24
Effects
Wall Rush
CP (mastered)
30 (15)
[Fusillade] Particle Beam83FRanged High
[Long, 83F] Secondary pressure in neutral, close to Long-Range: it forces a dodge or a defensive reaction from passive opponents at midrange. The projectiles are active from the moment they are fired and protect her front, then the dodge timing becomes ambiguous (different angles and timings); they keep striking even after her own dodge. Steerable with the stick until the shot, but dangerous if the opponent interrupts with an assist or a dash; it also allows extra long-range pressure after Jecht's aerial BRV.
Startup
83F
Priority
Ranged High
EX Force
0
Effects
Wall Rush
CP (mastered)
30 (15)
[Wrath] Particle Beam (midair)1F~13F (Block) ~56F (missed block recovery) 45F (counter attack)Block High / Ranged High
The aerial version of the command block, strongly recommended: the same behaviour (instant guard, short duration, a beam on the opponent on a successful block). Since competitive play happens largely in the air, it is a valuable self-defence tool, notably right after an air dodge to make the evasion far safer; an inconsistent reward against projectiles and a brief vulnerability to assists after the beam.
The “Flood of Darkness!” EX Mode: Regen, Critical Boost and Null Particle Beam. Null Particle Beam cancels the recovery of any attack by performing an HP attack: safer whiffs (chain into Wrath for protection), a more forgiving Pain 3 > Anti-Air combo, and above all Pain 3 > Wide-Angle / Feint, which becomes a reliable midscreen combo with Wall Rush HP damage. There is no apparent limit to chaining HP attacks while EX Mode is active — enough to saturate the stage too (repeated Wide-Angle, Aura Ball, Wrath).
The EX Mode remains held back, however: EX Modes often serve to guarantee a win off an assist combo, which she benefits from little, and Cloud of Darkness fills her EX gauge poorly — most of her attacks generate no EX and races for EX Cores are hard with her slow dash and her long animations.
EX Burst : Ultra Particle Beam: hold Circle to fill the gauge up to 120 % then release quickly (an execution close to Exdeath's EX Burst). Modest bravery damage (low initial base damage), but enough to end a match after an assist combo with a Wall Rush.
Gameplan & advanced tech
Play the defender just outside the opponent's poke range: that is where she thrives. On the ground, mix Tentacle of Pain and Tentacle of Spite (Spite's mid priority follow-ups hold the neutral, Spite 3 staggers blocks and supports approaches); in the air, Wrath Particle Beam after your air dodges makes melee characters hesitate, and Aura Ball allows her to bide her time and fill the assist gauge more calmly, if not quickly.
The reference solo combo is Tentacle of Pain 3 (bolts) > Anti-Air Particle Beam, extendable with an assist behind it; at long range, Spite 3 > jump > Free Air Dash allows a bravery conversion. The practical assist combos start from a Wall Rush, from Spite 2, Spite 3, Suffering 2 or Scorn 2. Remember to move away from the opponent after calling the assist on Spite 2 / Suffering 2 so as not to push them out of the combo.
Manage the commitment: every bravery attack is a full stance that can only be dodged out of after the third swipe — use the stick glide to create distance, extend the effective range or evade an advancing block. Against defensive opponents, accept that the race for EX Cores and gauge is unfavourable: the rewards come from reads, from Wrath and from HP attacks that force a dodge (Wide-Angle + Spite 3 / an assist to create inescapable situations, reinforced further in EX Mode by Null Particle Beam).
Character-specific tech
Landing cancel bug
A landing cancel bug, to be exploited first and foremost with Long-Range Particle Beam: it makes the attack safer and turns it into a solo combo starter, with Anti-Air Particle Beam or aerial bravery attacks to follow.
Aura Ball okizeme
Thanks to Aura Ball's long active frames and relatively early dodge window, a bravery Wall Rush or a Fusillade leaves time to place a delayed explosion: impractical in open space, but playable in nooks and corners, with solo combos as the payoff.
Reflecting Suffering 3 to trigger Wrath
Against characters such as The Emperor and Ultimecia, fire Suffering 3 at walls so that the projectiles are reflected back at you: they then act as a trigger for the Wrath Particle Beam command block.
Documented solo combo routes
An EX Mode built entirely around combos, but a fair number of routes exist outside it despite her mediocre frame data. The record abbreviates the names: the number designates the tentacle variant (follow-up 1 to 3) and “Beam” the Particle Beams. Routes: Tentacle of Pain 3 > [Anti-air] Particle Beam, [Feint] Particle Beam EX or [Wide-Angle] Particle Beam EX; Tentacle of Spite 3 (mid to long range, short in EX) > dodge cancel outside EX > [Wide-Angle] Particle Beam; [Wrath] Particle Beam > DC > Tentacle of Suffering 1 or 2, or Tentacle of Scorn 1; Aura Ball (delayed hit) > DC > Suffering 1, Scorn 1 or [0-form] Particle Beam EX; Pain 3 > DC > either of the two aerial tentacles (Suffering, Scorn); Scorn 3 (close to the ground) > [0-form] Particle Beam EX or a dash into an aerial tentacle; Suffering 1 > [0-form] Particle Beam EX; Suffering 1 at the ceiling > DC > Suffering 1.
Cloud of Darkness has a handful of combo routes both solo and with assist. Solo combos get more situational and difficult pretty quickly, but assists can help set them up.
This section does not show all combos right now. They will be listed more thoroughly on a separate combo page in the future.
The most practical solo combo route usually involves Tentacle of Pain 3 (Bolts), followed by Spite 3 (Orb).
The damage values assume that any preceding tentacle hits connected.
Practical assist combos usually start with any wall rush, Spite 2 (Spin), Spite 3 (Orb), Suffering 2 (360°) and Scorn 2 (Vertical).
Universal techniques (blodge, dash feint, lock off, dodge punishment): see the Techniques & glitches page.
Matchups
The sources offer no per-matchup analysis (the page is a stub), but they sketch out tendencies: defensive, runaway opponents are her worst scenario — they outpace her on EX Cores and assist gauge, and her long-range provocation tools are mediocre. Conversely, Wrath Particle Beam commands respect from aggressive melee characters, whose dashes and low/mid bravery attacks it staggers.
A few named markers: against The Emperor and Ultimecia, a Suffering 3 reflected by the walls can trigger Wrath; beware Sephiroth's (Shadow Flare) and Gilgamesh's (Electrocute) projectiles as well as Garland's disjointed Chain Cast, which go through the Aura Ball defence. Finally, the documented damage build is recommended against Side by Side users who do not contest EX, such as Firion, Onion Knight and Golbez.
The wiki documents a “Damage (High Base BRV)” build: 1523 base BRV, Kuja assist, Rubicante summon, Everdark / Chainsaw / Thornlet / Maximillian and boosters (Sniper Eye, Dismay Shock, Battle Hammer, BRV = 0, etc.), with the Equip Glitch assumed for the CP cost (440/450). The idea: heavy HP damage through Wall Rush — an assist combo started on an HP attack can exceed 3000 HP damage, coming from a naturally high bravery that the opponent's DEF barely reduces.
The build makes use of the exclusive LV100 weapon Everdark for its bravery recovery, which frees up room for base bravery, Wall Rush HP damage and resource depletion. BRV = 0 is the standout booster: it activates Sniper Eye and Dismay Shock on every Wall Rush from an HP attack (0-form Particle Beam, for instance), taking the multiplier from x2.3 to x3.3. Miracle Shoes and Maximillian offset the maximum HP lost to Chainsaw and Thornlet.
A Side by Side variant replaces First to Victory with Side by Side: HP attack reads become more rewarding, at the cost of completely disabling the EX gauge and EX absorption; the Empty EX Gauge booster then becomes available in place of another booster of your choice (Summon Unused, for instance). More broadly, the character lends herself to damage builds as well as Side by Side builds, with the Mindbreak synergy on the margins (bravery accumulated by destroying the scenery with Wide-Angle Particle Beam).
The damage build is recommended against Side by Side users who do not contest EX (Firion, Onion Knight, Golbez); getting damage in early as the attacker, while risky, is judged profitable there because experienced opponents bide their time before approaching.
Build and check a Cloud of Darkness loadout slot by slot: build creator (CP gauge, ability exclusions and tournament rules applied).
Assist synergies
Cloud of Darkness as an assist
Cloud of Darkness is ranked Low on the assist tier list (Muggshotter) and the wiki offers no written evaluation of her role as an assist (the “Assist Overview” section is empty).
Her assist data: Tentacle of Pain (ground BRV, 37F, Wall Rush, up to 62 base), Tentacle of Suffering (air BRV, 37F, Chase, 40 base), [Anti-air] Particle Beam (ground HP, 39F, Chase) and [Fusillade] Particle Beam (air HP, 83F, Wall Rush).
Recommended assists
Kuja — Cited as a good assist in the Synergies section; he is the assist of the documented build, and Feint Particle Beam serves as an HP combo filler with his ground BRV.
Jecht — Cited as a good assist; the documented assist combos use him, Feint serves as a filler with his aerial BRV, and Fusillade extends the pressure at long range by making the most of his long knockdown.
Exdeath — Cited as a good assist; Suffering 1 acts as a combo filler during his aerial BRV assist.
Aerith — Suffering 1 combos into the Aerith assist anywhere thanks to the Chase, where Kuja and Jecht require a ceiling or a corner.
Community tech
EX Mode Pain 3 > Anti-Air Particle Beam Corner Combo
A demonstration video of the corner combo made possible by Null Particle Beam: Tentacle of Pain 3 chained into Anti-Air Particle Beam during EX Mode.
Dissidia 012 [Duodecim] Final Fantasy- Cloud of Darkness: EX Revenge Basic Combos 2011
A period video by CaminoalAlba detailing Cloud of Darkness's EX Revenge combos, including the chaining of bravery attacks into HP attacks allowed during EX Mode.
A community record of solo combo routes for all 31 characters, compiled by Eddiegames on the Discord DISSIDIA and published on pastebin (last updated December 2022). Cloud of Darkness is described there with an EX Mode built for combos and a fair number of routes outside it.
The wiki's Matchups page is a stub: no detailed analysis per matchup.
No unique mechanic is documented (the section is absent from the wiki) — the three-part stances are described in the move notes, not in a dedicated section.
No written evaluation of the character as an assist (the “Assist Overview” section is empty): only the data table and the Low meta ranking are available.
The combos are incomplete by the wiki's own admission (“This section does not show all combos right now”); the damage and EX gains of the Jecht assist combos are marked “???”.
The CP cost of Tentacle of Pain is partly unknown (“?? (30)”) and the assist gauge gain per move is not filled in.
 Assist
 Rubicante
 Everdark
 Chainsaw
 Thornlet
 Maximillian
 Sniper Eye

 BRV = 0
 Summon Unused
 Pre-EX Mode
 Blue Gem

